My mom's found a craft magazine that suggests to make a card with basic supplies. My mom is all about getting into crafty things again lately (when I was smaller she was super-crafty), she even started to visit a crafty club in town every 2 weeks. Now she rang me like 3 days ago what embossing powder and a heat gun were because she didn't know but would like to try that card in the magazine. LOL I immediately promised her to take home some supplies with me and that I'dshow her the basics this weekend. I also packed a flower and leaves stamp and 2 different inks besides Versamark, my heat gun, powder tool and 3 kinds of embossing powders. I'm so excited! :))
2013. február 15., péntek

2013. február 12., kedd
Beautiful Day
I'm a U2 fan. This is the song I will love forever. And it also reminds me to love and cherish life. And what could be a more beautiful day then spending it with your loved one? Or even travelling on that day? I'm sure you understand now why this my love song is. :)

Though it's very hard for me to get a smooth image with Amy Tangerine stamps, this crack-like feature here is on purpose. :) I also dared to cut a stamp in half for the first time. See the missing piece of 'What A Beautiful Day? No? Because I cut it off. LOL Don't worry it's safe and sound and ready to be re-attached any time. :)
Have a great Tuesday!
Challenges:
CAS-ual Friday - Love Song
Simon Says Stamp - Have a Heart
Just Add Ink - Just Add Hearts
Daring Cardmakers - Love is In The Air
Staempeltraeume - Herzen
Crazy 4 Challenges - Hearts (no red or pink)
Supplies: Stamps from Amy Tangerine, Paper Smooches (Alpha-dot), Simon Says Stamp, Inks - Hero Arts Midtone inks (Raspberry, Butterbar, Cup O' Joe, Tide Pool)
2013. február 5., kedd
The Owl
This is my 3rd post today, I'm on a roll! Please scroll down for my peaking giraffe and some polka dots.


My colleague also loves owls. So I thought I'd make a tiny gift for her. This is a magnetic bookmark and also my first try with this LF owl and Copics.
Challenges:
Supplies: Neenah cardstock, LF - owl stamp, Amy Tangerine - heart stamps, Colorbox ink - red, Copic Ciao markers, Memento - Tuxedo black, small pieces of magnetic sheet
The Polka Dots
This is my 2nd post today. Please scroll down for my card with a peaking giraffe and up for a cute owl. :)


One of my colleagues, whom I spent the most time with so far, is leaving our company at the end of the month. She helped me a lot and also my colleagues when they got here. So we owe her a big thank you and wish her all the best at her new job.
Challenges:
Paper Smooches - Trend Watch Challenge (Yes, the polka dots are rather small but they're still polka dots, right? I was inspired by the photo to make something elegant with dots)
Supplies: Bazzil - Buttermint cardstock, kraft cardstock, PS - Alpha-dot set, HA - flower stamp, Versamark ink, HA Cup O' Joe ink, Kaiser Craft - blinge set
A Giraffe, Some Polka Dots And An Owl
Well, this time not on one card but I'd be fun to try making a scene of these all tree. :) I'll do 3 posts in total, so stay tuned!


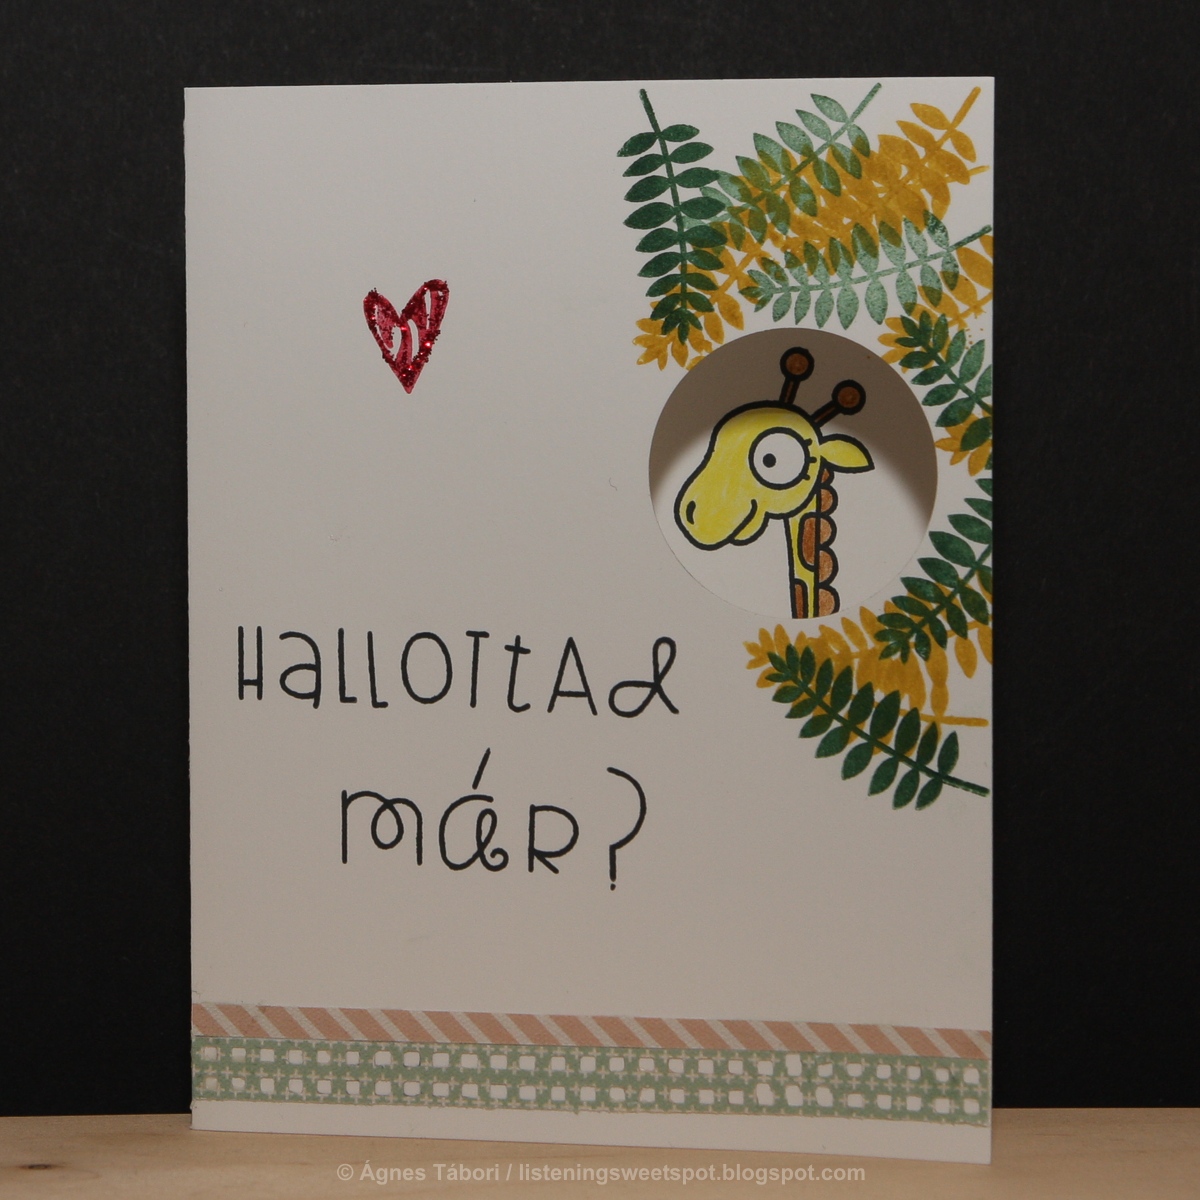
Have you heard about it?

Polly's turned 12!
I made this card for my little cousin and this ends the circle (I also made her a DIY notepad and a gift box for it, see my previous posts). This was the first time I used my new PS sets, I just love them, they're of great quality!
Challenges:
2013. január 29., kedd
DIY Notepad / Saját készítésű jegyzettömb
As promised now I'm revealing the gift that goes inside the little box I decorated with a pin wheel for my little cousin.
Tadaaa...
Ezt az ajándékot a kis unokatesóm szülinapjára készítettem, az előzőleg már bemutatott dobozkába.
Ezt az ajándékot a kis unokatesóm szülinapjára készítettem, az előzőleg már bemutatott dobozkába.

You can find several videos on Youtube about how to assemble it and I recommend this one.
Youtube-on rengeteg ilyen videót lehet találni, én ezt ajánlom.
Youtube-on rengeteg ilyen videót lehet találni, én ezt ajánlom.
In a nutshell, here's how I made mine: I cut some regular copy papers into 7x9,9 cm pieces (that fits the A4 size paper). Then a front cover and a back one in the same size from cardstock. I recommend to make the back cover in a darker shade because this notepad will be carried around all the time. :) Then I decorated the front cover with a couple of cute paper pieced elephants (brand new PS set for me, love it!), a piece of striped patterned paper and stamped "notes" (jegyzetek) on it. And here's the part that seems to be tricky but is quite simple. You have to be careful while glueing together all the pages so that all of them are in the same position. You'll have to put glue onto the top of the notepad and clip it together while it's drying. I used Tombow Mono Multi Glue for that. I did want it to make it so that you can tear out pages if you like but I didn't want it to fall apart. Especially, that my cousin will carry it around in school. So the next day I applied a second layer of glue and secured the whole thing with a piece of patterned paper.
Röviden összefoglalva így készült az enyém: sima nyomtatótpapírokat 7 x 9,9 cm-es darabokra vágtam (ez pont kijön többször az A4-es papírból). Aztán fehér és natúr alapkartonból ugyanekkora borítótt vágtam neki. A hátuljára sötétebb kartont ajánlok, mivel ezt úgyis mindenki cipeli magával. :) Az elejét egy kedves elefánt nyomdával dekoráltam, amit kétféle mintás papírra nyomtam, majd vágtam ki, ill. rányomtam, hogy jegyzetek és kapott egy szép árnyalatú papírcsíkot is, hogy ne lógjon az egész a levegőbe. Most következik a nehezebbnek tűnő rész, de higgyétek el, nem az. Az összefogott tömb tetejét be kell kenni valamilyen folyékony ragasztóval (én Tombow-t használtam), és utána rögtön erősen összefogatni valamivel (pl. fekete papírcsipesszel). Olyanra akartam csinálni, amiből bátran ki lehet tépni, ha akarja az ember, de nem esik szét a tömb. Pláne, hogy az unokatesóm még iskolás. Ezért másnap bekentem még egy réteg ragasztóval, amibe beleültettem egy darabka mintás papírt is, hogy biztosan összefogja.
Röviden összefoglalva így készült az enyém: sima nyomtatótpapírokat 7 x 9,9 cm-es darabokra vágtam (ez pont kijön többször az A4-es papírból). Aztán fehér és natúr alapkartonból ugyanekkora borítótt vágtam neki. A hátuljára sötétebb kartont ajánlok, mivel ezt úgyis mindenki cipeli magával. :) Az elejét egy kedves elefánt nyomdával dekoráltam, amit kétféle mintás papírra nyomtam, majd vágtam ki, ill. rányomtam, hogy jegyzetek és kapott egy szép árnyalatú papírcsíkot is, hogy ne lógjon az egész a levegőbe. Most következik a nehezebbnek tűnő rész, de higgyétek el, nem az. Az összefogott tömb tetejét be kell kenni valamilyen folyékony ragasztóval (én Tombow-t használtam), és utána rögtön erősen összefogatni valamivel (pl. fekete papírcsipesszel). Olyanra akartam csinálni, amiből bátran ki lehet tépni, ha akarja az ember, de nem esik szét a tömb. Pláne, hogy az unokatesóm még iskolás. Ezért másnap bekentem még egy réteg ragasztóval, amibe beleültettem egy darabka mintás papírt is, hogy biztosan összefogja.
And that's all folks. Sounds fun, ha? Hope you like it and will give it a try. :)
Remélem tetszett és kipróbáljátok! :)
Remélem tetszett és kipróbáljátok! :)
I'm also entering this into the following challenge: Simon Says Stamp - Let's Get Paperpiercing.
Thanks for stopping by!
Supplies: Neenah Desert Storn / Solar White cardstock, regular copy paper, Sweet Day 6x6 pad (Echo Park), A Little Lovin / Alphadot stamp set (Paper Smooches)
Supplies: Neenah Desert Storn / Solar White cardstock, regular copy paper, Sweet Day 6x6 pad (Echo Park), A Little Lovin / Alphadot stamp set (Paper Smooches)
2013. január 27., vasárnap
Gift Box With Pin Wheel
This is my 2nd post today, please scroll down for my Calendar Pages vol. 2.
I made this box for my little cousin's birthday gift, which I'll be also revealing here soon. :)
I made this box for my little cousin's birthday gift, which I'll be also revealing here soon. :)
The inspiration came from this pin. The washi tape was in last year's April Simon card kit (and I still have a lot of it), the box and the pin is from my local craft store. The patterned paper was one of my very first ones, I think it's from a BoBunny collection.
Ezt a dobozkát a kis unokatesóm szülinap ajándékához készítettem, amit szintén hamarosan megmutatok. :)
Az ötletet innen jött. A dekortapasz még a tavaly április Simon card kitből van (soha nem fog elfogyni), a dobozkát a hobbiboltban vettem. A mintás papír az első papírjaim egyike, azt hiszem a BoBunny kollekcióból.
Ezt a dobozkát a kis unokatesóm szülinap ajándékához készítettem, amit szintén hamarosan megmutatok. :)
Az ötletet innen jött. A dekortapasz még a tavaly április Simon card kitből van (soha nem fog elfogyni), a dobozkát a hobbiboltban vettem. A mintás papír az első papírjaim egyike, azt hiszem a BoBunny kollekcióból.

To be continued...
Folytatjuk....
Calendar Pages 2
This is my first post today, please also check out my gift box with a pin wheel.
Yes, I'm quite slow.... but at least they are ready. :)


You can find January and February here.
I'd like to enter the April page into Simon's Let's Get Paper Piercing challenge.
And I'd like to enter the May page into CAS-ual Fridays' Make Your Mark challenge (the tree is coloured with Copics).
Supplies: SRM stickers, Konnichiwa stamp set (HA&BG), Sunnier Days stamp set (Simon Says Stamp), Critters Down Under (Lawn Fawn), Geo-Graphic (Paper Smooches), Tuxedo black (Memento ink), Tide Pool/Raspberry Jam/Butter Bar (Hero Arts midtone ink), Red/pink/yellow ink (ColorBox), liquid pearl pen, Sweet Days 6x6 pad (Echo Park)
Yes, I'm quite slow.... but at least they are ready. :)
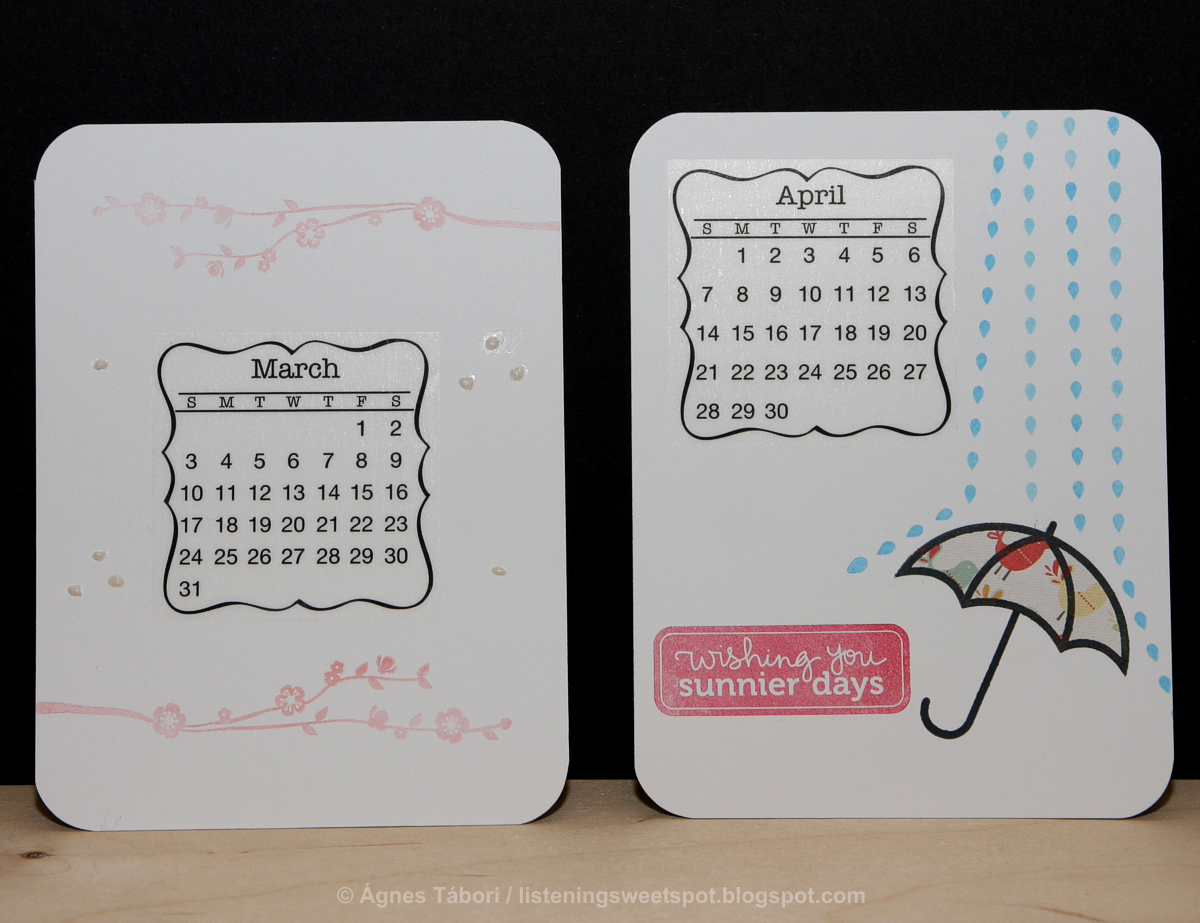

You can find January and February here.
I'd like to enter the April page into Simon's Let's Get Paper Piercing challenge.
And I'd like to enter the May page into CAS-ual Fridays' Make Your Mark challenge (the tree is coloured with Copics).
Supplies: SRM stickers, Konnichiwa stamp set (HA&BG), Sunnier Days stamp set (Simon Says Stamp), Critters Down Under (Lawn Fawn), Geo-Graphic (Paper Smooches), Tuxedo black (Memento ink), Tide Pool/Raspberry Jam/Butter Bar (Hero Arts midtone ink), Red/pink/yellow ink (ColorBox), liquid pearl pen, Sweet Days 6x6 pad (Echo Park)
2013. január 17., csütörtök
Washi + A Golden Oldie

I created this nameday card and matching envelope using my latest and most favourite washi tape. I love those birds so much sitting on a wire. The background was made with HA Tide Pool ink and a little bit of water, plus my heat gun. The stars were made with a punch that I got from my bf's sister to store it for her. But she lets me use it, as well. :) I also put some glossy accent on them to make them shine. Last but not least I used my second oldest stamp set - Harold's ABC from Lawn Fawn.
I'm entering this card into the following challenges:
Simon Says Stamp - Use Washi Tape
A Blog Named Hero - Golden Oldie
Supplies: Neenah Solar White cardstock, Copics, washi tape, Harold's ABC (Lawn Fawn), Tide Pool shadow ink (Hero Arts), Tuxedo Black ink (Memento), star punch, Corner Chomper (We R Memory Keepers)
2013. január 15., kedd
Customized Wrapping
I made this wrapping for my boyfriend's nephew who turned 5 last week. Why the air balloons, the baker's twine and the stylized compass? Because inside there was the 1st part of the Willy Fog dvd series – his favourite!
.jpg)
Supplies: orange and green baker's twine (The Twinery), Sweet Day 6x6 pad (Echo Park), Rich Cocoa dye ink (Memento), Shelter From the Storm stamp set (Simon Says Stamp)
Feliratkozás:
Bejegyzések (Atom)